Dry Fit Kitchen Cost Estimator
Estimated Cost Range
If you’ve heard the term dry fit kitchen and wonder what it actually means, you’re in the right place. Below you’ll find a plain‑English breakdown, the pros and cons, and a step‑by‑step look at how to install one yourself or with a pro.
Key Takeaways
- A dry fit kitchen is a pre‑assembled, modular system that snaps together without wet trades like plaster or grout.
- It cuts installation time roughly in half compared with traditional built‑in kitchens.
- Because components are prefabricated, you get tighter tolerances and less on‑site waste.
- The system works best in remodels where walls are already plumb and you have a clear layout plan.
- Cost is lower than a custom built‑in, but you trade some design flexibility.
What Is a dry fit kitchen?
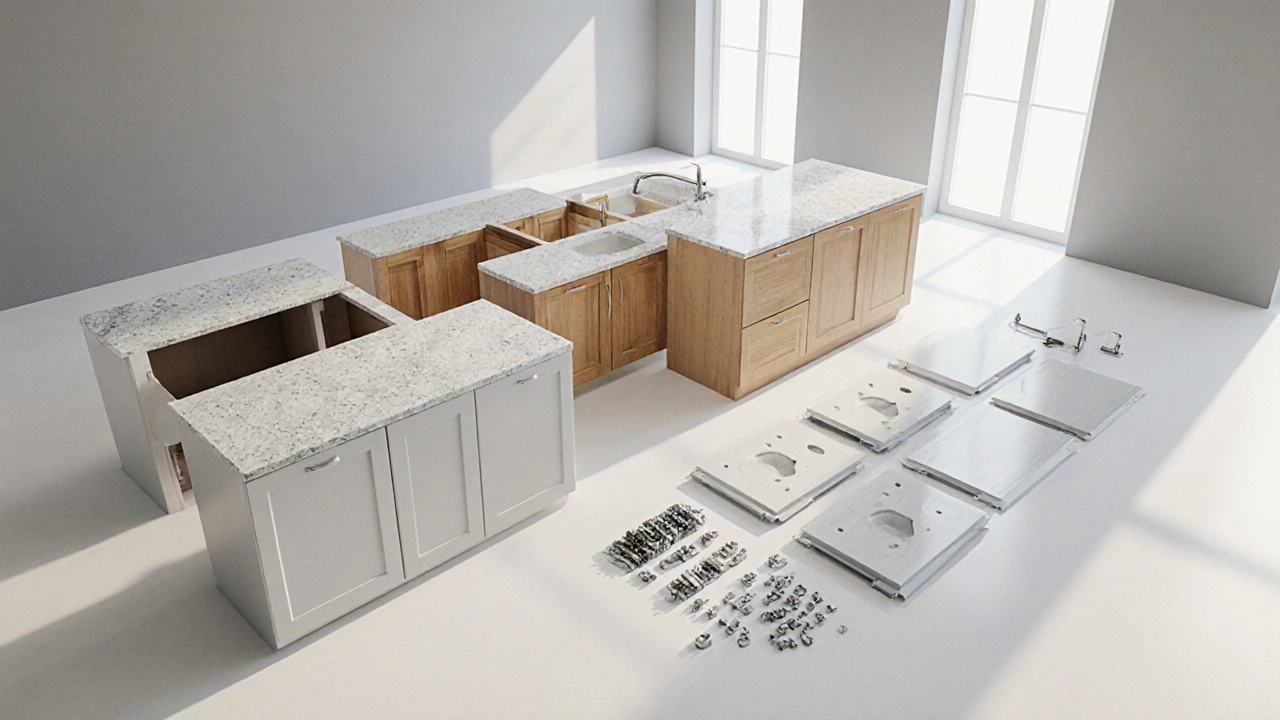
A dry fit kitchen is a modular kitchen in which cabinets, countertops, and hardware arrive pre‑drilled and pre‑finished. The pieces lock together using concealed brackets, clips, or a simple screw‑and‑plug system-no need for wet‑apply adhesives, mortar, or custom carpentry on site. The term “dry fit” comes from the fact that the whole assembly can be put together in a dry environment, keeping the space clean and dry throughout the build.
How Does It Differ From a Traditional Built‑In Kitchen?
Traditional built‑ins are crafted on site. Carpenters measure, cut, and install each cabinet piece, often using nails, screws, & wood glue. Countertops may be poured in place or glued after cutting, requiring wet trades like plaster and tiling. This approach offers unlimited design freedom but brings longer timelines, higher labor costs, and more on‑site mess.
A dry fit system standardizes dimensions and connections. Think of it like Lego for kitchens: you snap components together, and the final look mimics a custom build. The trade‑off is a narrower range of sizes and finishes, though many manufacturers now offer dozens of style options that mimic high‑end wood grain or matte finishes.
Core Components of a Dry Fit Kitchen
- Cabinet carcasses - usually made of high‑density particleboard or MDF with a moisture‑resistant laminate.
- Countertop panels - often pre‑cut quartz, solid‑surface, or engineered stone that includes pre‑drilled sink cutouts.
- Hardware kits - concealed brackets, cam‑lock fasteners, and alignment pins that secure everything without visible screws.
- Backsplash panels - lightweight, snap‑on tiles or sheet material that finish the wall behind the countertop.
- Plumbing and appliance interfaces - standardized openings for faucets, dishwasher, and range hood that line up with the pre‑drilled cabinet layout.

Materials That Make a Dry Fit Kitchen Work
Because the system relies on dry assembly, manufacturers choose materials that won’t swell or warp with humidity. Typical choices include:
- Moisture‑resistant MDF - denser than regular particleboard, sealed with a waterproof veneer.
- Laminate finishes - scratch‑proof and easy to clean, available in wood grain, solid color, or high‑gloss.
- Engineered stone countertops - consist of crushed stone bound with resin, offering the look of granite without heavy polishing.
- Aluminum or steel hardware - provides strong, corrosion‑free connections for the snap‑fit system.
All of these components are tested for durability, and the factory‑controlled environment ensures consistent quality.
Step‑by‑Step Installation Overview
- Plan the layout. Measure wall lengths, ceiling height, and appliance openings. Sketch a simple diagram showing where each cabinet will sit.
- Order the system. Provide your measurements to a reputable dry fit supplier. Most will send a cut list and a hardware kit with everything you need.
- Prepare the space. Remove old cabinets, clean the walls, and ensure all studs are level. Install a moisture barrier if the kitchen is over a slab.
- Assemble the base cabinets. Using the supplied brackets, snap the base units together on the floor. Check for levelness with a spirit level; shims can be added under the cabinets if needed.
- Attach the wall cabinets. Starting from the corner, lift each wall unit and secure it to the studs using the cam‑lock fasteners. A helper is useful here.
- Install the countertop. Slide the pre‑cut countertop onto the base cabinets, align the sink cutout, and lock it into place with the hidden clips.
- Fit the backsplash. Snap the backsplash panels onto the wall cabinets, trimming any excess with a utility knife.
- Hook up plumbing and appliances. Connect the faucet, drain, and waste lines. Slide the dishwasher and range into their openings; most dry fit systems include quick‑connect fittings.
- Finishing touches. Attach handles, install drawer slides, and add any decorative molding that came with the kit.
- Inspect and clean. Walk the kitchen, tighten any loose fasteners, and wipe down all surfaces. You’re ready to cook!
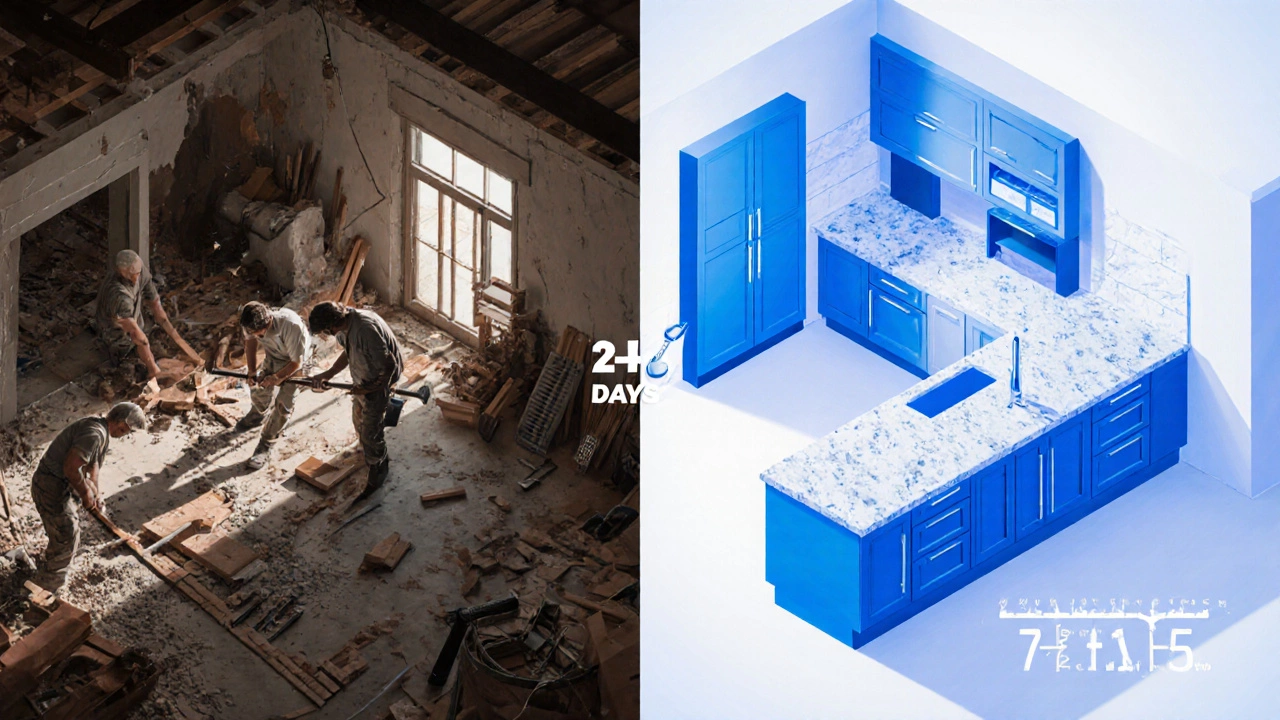
The whole process can be finished in 2-4 days for a typical 10‑person household, compared with a week or more for a custom build.
Advantages and Drawbacks
| Aspect | Dry Fit Kitchen | Traditional Built‑In |
|---|---|---|
| Installation Time | 2-4 days | 7-14 days |
| Labor Cost | Lower - fewer skilled trades | Higher - carpenters, plumbers, tilers |
| Design Flexibility | Moderate - set of standard modules | High - custom dimensions, finishes |
| Material Waste | Minimal - factory‑cut components | Higher - on‑site cuts and off‑cuts |
| Durability | Strong - engineered panels | Very strong - solid wood, stone |
| Water Damage Risk | Low - moisture‑resistant panels | Variable - depends on installation quality |
In short, a dry fit kitchen shines when you need speed, cost control, and a clean build site. If you crave a truly bespoke layout with exotic materials, a traditional approach still wins.
Cost Considerations
Pricing varies by brand, finish, and square footage, but a rough rule of thumb helps you budget:
- Base cabinets: $80-$150 per linear foot.
- Countertop panels: $50-$120 per square foot.
- Hardware kit: $200-$400 per kitchen.
- DIY labor (if you do it yourself): $0-$300 for tools and occasional pro help.
Compare this with a custom build that can easily exceed $300 per linear foot when you factor in high‑end wood, stone, and skilled labor. For many homeowners, the dry fit route saves 20-30% on total cost.
When to Choose a Dry Fit Kitchen
Consider a dry fit system if you meet any of these conditions:
- You’re renovating a mid‑size kitchen (10-15ft wide) and want the job done in a weekend.
- You have a modest budget but still want a modern look.
- You’re comfortable handling basic measurements and fastening tools.
- You plan to sell the house soon and need a clean, quick upgrade.
If you’re dealing with an oddly shaped layout, ultra‑high‑end finishes, or need to integrate built‑in appliances that don’t match standard dimensions, a traditional custom build may be the safer choice.
Common Pitfalls and How to Avoid Them
- Incorrect measurements. Double‑check all dimensions before ordering. Measure twice, order once.
- Uneven walls. Use a laser level to verify wall plumb before attaching wall cabinets. Small shims can fix minor deviations.
- Skipping the moisture barrier. In basements or over concrete slabs, a thin polyethylene sheet protects the MDF from hidden moisture.
- Rushing the hardware. The cam‑lock system is forgiving, but you still need to tighten each fastener snugly to prevent later squeak.
Next Steps
Ready to move forward? Here’s a quick checklist:
- Measure your kitchen walls, floor, and appliances.
- Choose a reputable dry fit supplier (look for reviews on fit‑and‑finish quality).
- Order the system with a clear delivery window.
- Gather tools: drill, level, rubber mallet, tape measure, and safety glasses.
- Clear the space, then follow the step‑by‑step guide above.
Even if you decide to hire a contractor, sharing this guide helps you ask the right questions and keep the project on schedule.
Frequently Asked Questions
Can I install a dry fit kitchen myself?
Yes, most homeowners can handle the assembly with basic tools. The key is accurate measurements and following the supplied hardware instructions. If you’re unsure about plumbing connections, call a licensed plumber for that part.
How does a dry fit kitchen handle water exposure?
The cabinet cores are made from moisture‑resistant MDF or particleboard, and the finishes are sealed laminates. As long as you install a proper moisture barrier under the floor and keep the countertop sealed, the risk of water damage is minimal.
What’s the typical lifespan of a dry fit kitchen?
With normal use, these systems last 10-15 years before you might notice wear on the laminate. Replacing hardware or resurfacing the countertop can extend the life further.
Are there any design limitations?
Because the modules come in standard widths (usually 12, 15, and 18 inches), you can’t create ultra‑narrow or ultra‑wide custom cabinets. However, many manufacturers now offer a wide palette of door styles, colors, and hardware finishes that look high‑end.
How much does a dry fit kitchen cost compared to a custom build?
A dry fit kitchen typically runs 20‑30% cheaper than a fully custom built‑in, mainly because labor and material waste are reduced. For a 100‑sq‑ft kitchen, you might spend $8,000-$12,000 versus $12,000-$18,000 for custom work.
Written by Fletcher Abernathy
View all posts by: Fletcher Abernathy